Pyrodactyl Installation Guide

Pyrodactyl is a panel that is mainly used for game server management. It allows users to create game servers for different games on-demand and provides an interface to manage the servers.
Important Resources:
- Pyrodactyl Docs - https://pyrodactyl.dev/docs/pyrodactyl
- Installation Steps - https://pyrodactyl.dev/docs/pyrodactyl/installation/fresh-installation
- Elytra Setup - https://pyrodactyl.dev/docs/elytra
Installing Pyrodactyl
To install the Pyrodactyl panel, we will be using Docker. If Docker is not yet installed, the following script can be used to install it.
https://github.com/twilhx/Project-Examples/blob/main/Scripts/docker-install.sh
Once Docker is installed, the following Compose file from the official documentation can be used to deploy the panel.
https://raw.githubusercontent.com/pyrodactyl-oss/pyrodactyl/main/docker-compose.example.yml
Note that the following must be changed under the x-common section:
MYSQL_PASSWORD - (The MYSQL user password)
MYSQL_ROOT_PASSWORD - (The MYSQL database root user password)
APP_URL - (The URL that will be used to access the web UI)
Optionally, it is recommended to setup an email service to send items such as password reset emails and invitations when adding additional users to manage a game server.
Once configured, the sudo docker compose up -d command can be used to deploy the panel.
Once deployed, the following command can be used to create a new user to access the panel.
docker compose exec panel php artisan p:user:make
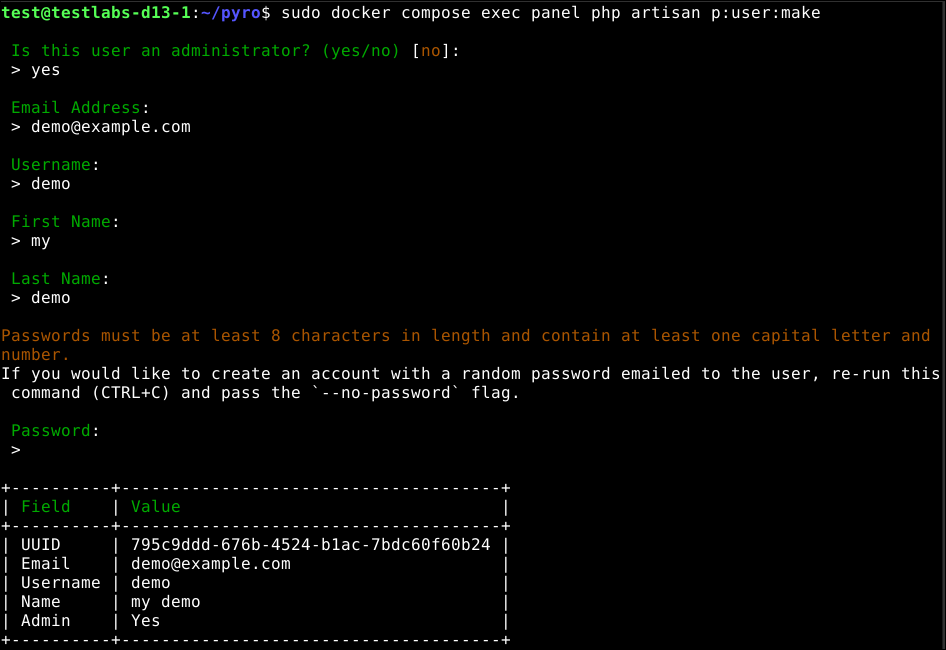
Once a user has been created, navigate to the web UI using the URL that was set in the x-common section of the Docker Compose file.
Installing Elytra
Elytra is an agent that allows a host to run the game servers. The agent can be installed on the same host as the panel or on separate hosts. It allows all hosts to be centrally managed, allowing an easy to scale up or down as needed.
Before installing the Elytra agent, we will need to install Docker on the host that will be running Elytra. If Docker is not yet installed, the following script can be used to install it.
https://github.com/twilhx/Project-Examples/blob/main/Scripts/docker-install.sh
Once Docker is installed, run the following commands using root privileges:
sudo curl -L -o /usr/local/bin/elytra https://github.com/pyrohost/elytra/releases/latest/download/elytra_linux_amd64
sudo chmod u+x /usr/local/bin/elytra


mkdir -p /tmp/rustic-install
curl -L https://github.com/rustic-rs/rustic/releases/download/v0.10.0/rustic-v0.10.0-x86_64-unknown-linux-musl.tar.gz | tar -xz -C /tmp/rustic-install
sudo mv /tmp/rustic-install/rustic /usr/local/bin/
The above commands will install Elytra (used to manage game servers via the panel) and rustic (used for backups). Optionally, TLS can be used to encrypt traffic. Installation and setup steps can be found in the official documentation.
Once all the files are downloaded, we will need to setup a Systemd task for Elytra.
sudo nano /etc/systemd/system/elytra.service
Copy the following into the above file:
[Unit]
Description=Pyrodactyl Elytra Daemon
After=docker.service
Requires=docker.service
PartOf=docker.service

[Service]
User=root
WorkingDirectory=/etc/elytra
LimitNOFILE=4096
PIDFile=/var/run/elytra/daemon.pid
ExecStart=/usr/local/bin/elytra
Restart=on-failure
StartLimitInterval=180
StartLimitBurst=30
RestartSec=5s

[Install]
WantedBy=multi-user.target
Once done, save and exit the file (e.g., ctrl + s and ctrl + x if using nano).
Once installed, we will need to navigate to the panel admin settings > Locations and create a new location. Locations are groups that hosts (servers running the game servers) will be added into.
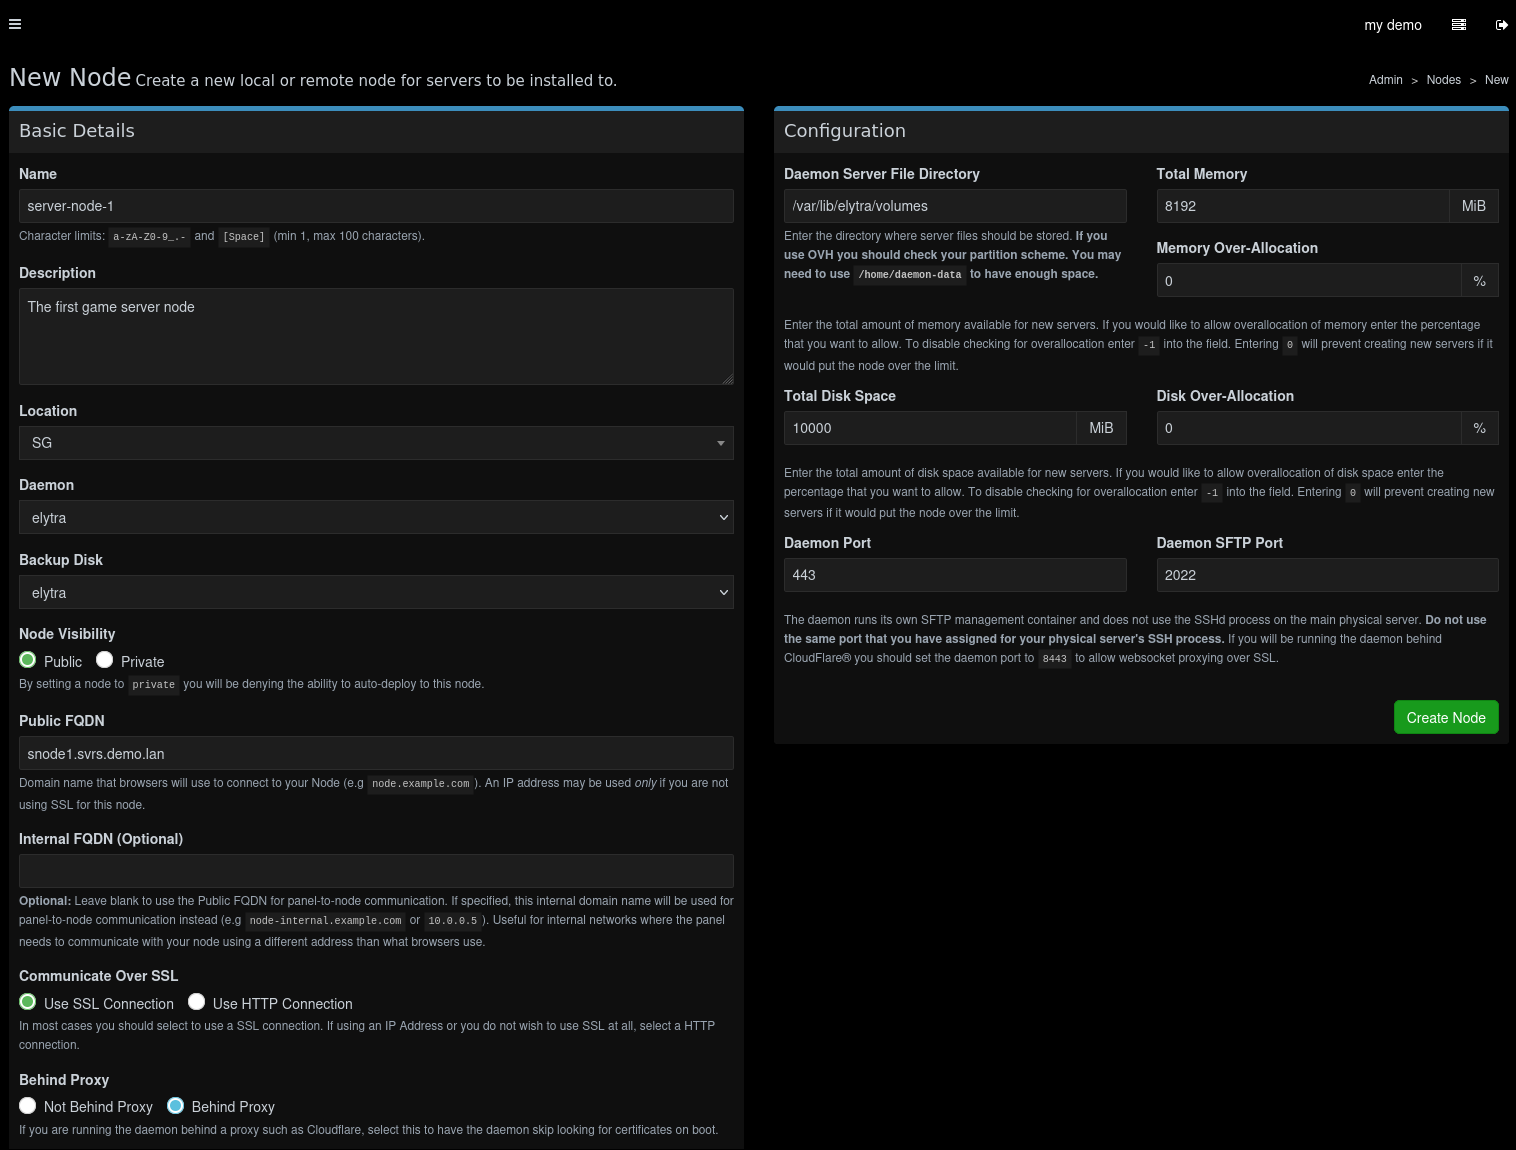
Once created, navigate to the "node" section to add a new node (server/host). The following information is required:
- Name
- Fully Qualified Domain Name (FQDN). This is used to connect to the node
- Total memory, CPU cores, and storage available to Pyrodactyl to use
Set both the Daemon and Backup Disk to elytra. If a reverse proxy is used, set the Behind Proxy option to Behind Proxy.
Optionally, specify if SSL (TLS) should be used when connecting to the Elytra node. If using a proxy, it is recommended to use port 443 (HTTPS) instead of the default 8080.
Once configured, navigate to the Configuration tab of the node and click the Generate Token button to create a one-liner to copy and paste the configuration.
port field value under the api section to port 8080.Visual example:
User ----port 443----> Reverse Proxy ----port 8080----> node
If the port field value is set to port 443 without valid SSL/TLS on the node, it will cause an error.
Once configured, the sudo elytra command can be used to test the configuration on the host. If there are no errors, the Elytra service can be enabled using the following command.
sudo systemctl enable --now elytra
Once enabled, the panel will be able to connect to the node and game servers can be created. The steps covered here can be used to deploy multiple nodes.